Measurement solutions for hot metals forming
When it comes to the measurement of distances or -even more complex- object dimensions in industrial contexts, there is no one and only right solution. Various methods are available, depending on the specific measuring task and requirements.

We at mecorad looked at our customers’ specific situation in the up- and downstream processing of hot steel and metal, which is – as you might imagine – extremely challenging.
The following considerations led the way to our choice and might help you with your decision:
- What level of accuracy has to be realised?
- What about prevailing environmental conditions? Is there dust, steam, heat? A vacuum?
- Are there any specific characteristics of the object’s material?
To answer the above issues, one has to take at least a short look at the pros and cons of the measuring principles.
In this article, we limit our comparison to the contactless methods of laser, ultrasound and radar. These three are often chosen and – compared to isotopic solutions, such as X-ray – do not imply hazardous radioactive exposure of the worker and workplace.
Ultrasound
Ultrasound sensors measure distances by using the time-of-flight principle.
Ultrasound waves are pulses of sound at a frequency between 20 kHz and 1 GHz, higher than humans can hear. Bursts of these waves are emitted in a certain time cycle from a sensor and move in the air at the speed of sound. Hitting an – in our case metallic- object, they are reflected by the object’s surface. These reflected echoes return to the sensor. By measuring the time shift of the reflected echo, the distance covered is determined and displayed to the user.
Ultrasound is very suitable for complex objects, even transparent or highly shining ones within homogeneous material, where there is only low sound absorption. That is why it is often used for quality control to mark defective structures of the material, inclusions, or impurities within a certain material.
However, moving in a heterogeneous environment, the speed of the waves can be interfered by several conditions, such as instable temperatures or a change in the air composition surrounding the object.
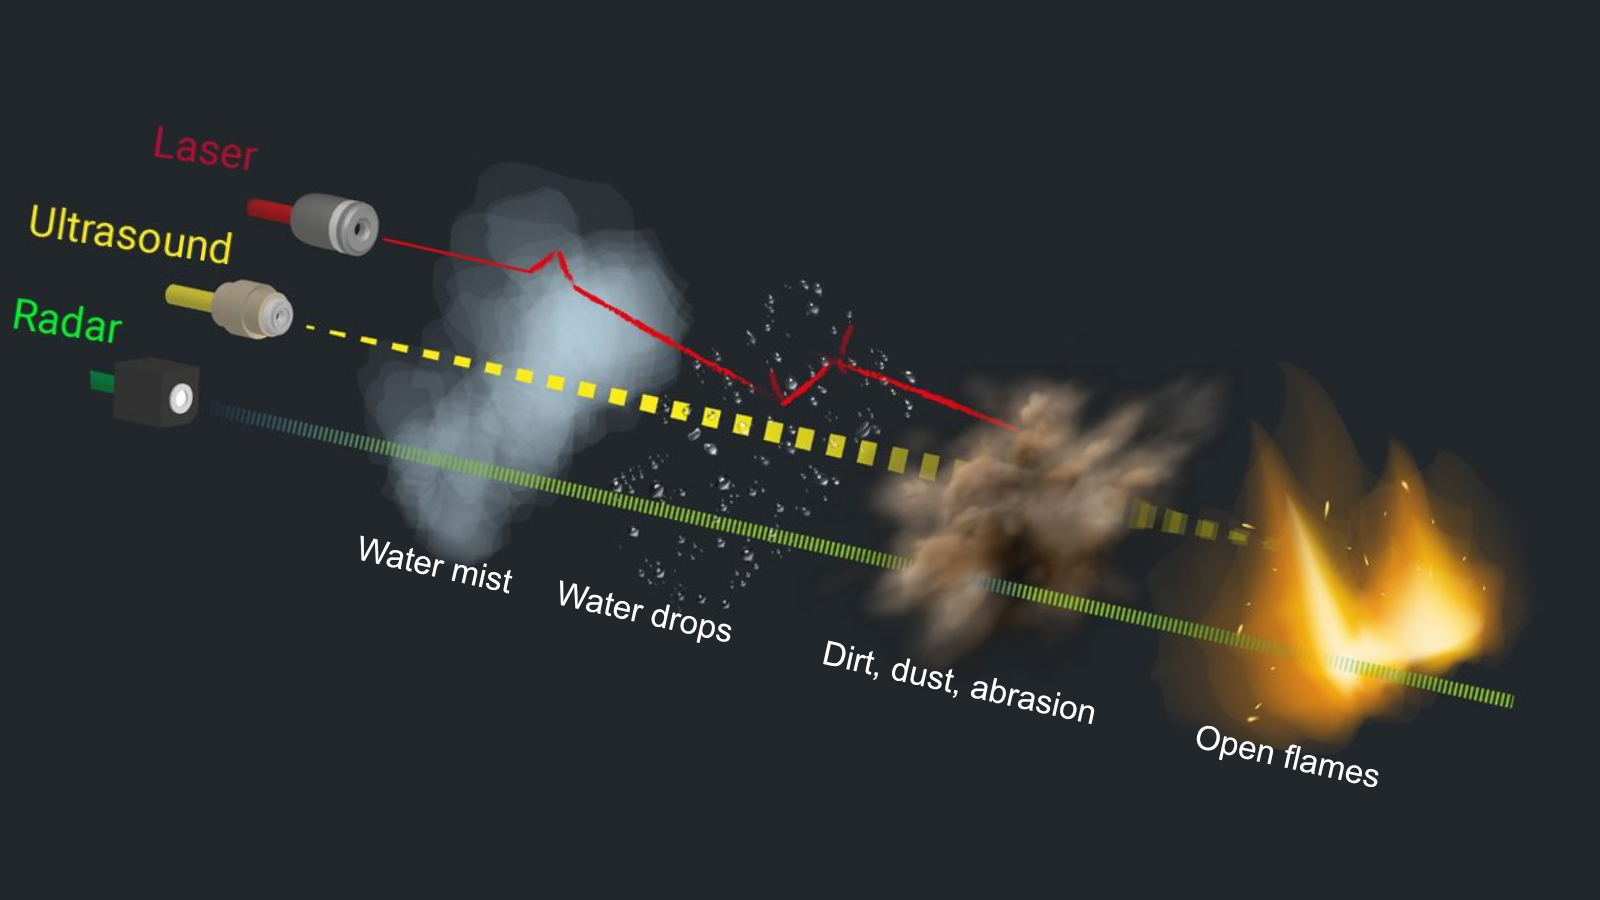
Metal processing usually is not a clean room. So imagine your rather dusty workspace. Or think about the steam of the cooling water. The ultrasound waves are distracted at the micro water drops in the air, leading to an interruption of the transmission and reflection of the signal. The measurement results are no longer precise. Hot objects, like glowing steel slabs, also cause heat convection in the surrounding air by themselves. These convections again interrupt the ultrasound signal.
Laser
The word laser is the acronym for light amplification by stimulated emission of radiation. Laser beams consist of electromagnetic waves that move at the speed of light (approx. 300000 km/s).
Today, there is a range of laser use cases with a variety of measurement tasks. Lasers can be used for detection, counting of objects, etc. A well-known example for electro-optical measurement of distances and the derived calculation of speeds is even used by the police for speed control.
In our industrial context, measurements are based on one of the following principles: triangulation, phase shift or time-of-flight, the last as explained before.
Laser sensors are highly precise under determined conditions and therefore often used for measurement tasks in industrial environments. But they lack, if dust or deposits block the view, so the beam can not be emitted properly. And nobody wants to check or clean the laser sensor every once in a while, right?
Also, at open flames or glowing objects, measurement with standard red-light-laser supplies incorrect signals. The reason for this is the similar frequency of infrared radiation of the laser and the color spectrum of the glowing surface. The dimensions of the object are not recognized correctly, the laser might measure into the surface. In these cases, blue-light laser with a huge spectral distance might be a solution, but they are rather expensive and not the first choice for other measuring tasks.
Wet, dusty or smeared surfaces have strongly changing reflective properties, declining measurement accuracy, as well. The distance between a laser sensor and the measuring object is restricted to very little variations to deliver robust signals. And huge water drops, as one can find in the steel industry´s cinder wash, refract the laser signal.
Radar
Radar measurement is based on electromagnetic waves. The sensor emittes the high-frequency signal, which also propagates at the speed of light, and calculates the distance to an object by measuring the reflection of the signal from that object.
Radar measurement captures a spot that can be focussed by lenses or antennas. Comparable to focussing a flashlight on a wall, this spot can be more or less focussed. Because of this, even when obstructions occur in the direct line of sight, the sensor still captures the rolling stock.
Radar waves are insensitive to adverse environmental conditions such as high temperatures or polluted air. Fog, for example, is much more permeable to radar radiation than to visible laser light. Even under zero-view conditions or while measuring through vapour, water drops, dust, cinder and open flames, the beams are still being controllable at high accuracy.
Though radar – compared under laboratory conditions – may not be as precise as laser, it is from our point of view, the most suitable solution for measurement of width, thickness and length of hot metal.
That is why we use it in our innovative IIoT measurement solutions.


